Showing posts with label 3D. Show all posts

Friday, March 1, 2013

Cancer Council Art Eggs


My boys have been doing something for others.
Its what we all need to do-
think of others a little more.


They have been decorating wooden eggs
for The Cancer Council.
These eggs are sold around Easter time as a fundraiser.
Some eggs are also given to the courageous people
 fighting the hardest of battles.


is not just an organisation.
Its backbone are the volunteers in the shops,
the researchers, the educators, the supporting carers.
Its backbone are the people,
 who search out schools and other community groups
 to help where they can.
They quietly plug away, 
doing and amazingly selfless job.


My students researched messages 
of hope that 'spoke to' them,
and used the words to decorate their eggs.

It was touching to see the boys
 approach this task with such pride and care.
 It was wonderful to use Art as a link between
the students and the community.


Thursday, August 16, 2012

Tissue BoxCover


I'm not overly emotional
 (well, you only have MY word on that one)


But when I go to the shops
 I don't by one box of tissues,
 I buy six!


 I am actually from loud sneezing, 
allergic rhinitis royalty.

 My tissue use is prolific.


Now while my nose likes to get a littler hyper,
my eyes work perfectly.
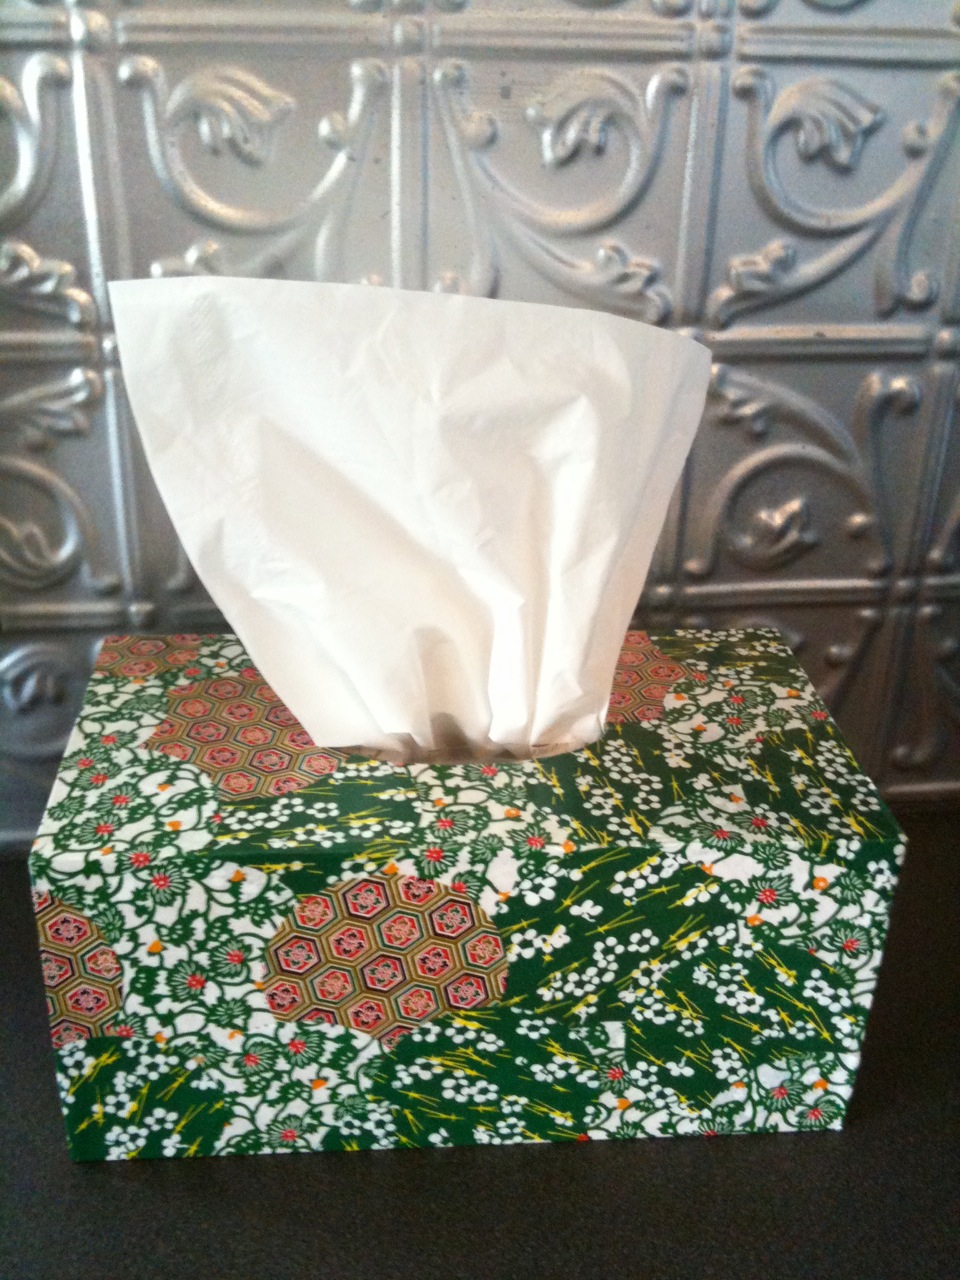
So this week I set out to create a tissue box cover
 that would mask the ugly boxes that decorate my bench tops.


I punched out some circles from origami paper

and mod-podged them randomly onto a mdf blank.
Finally, I sealed them with a few coats of Mod-Podge.


It was ridiculously easy, relaxing and I kind of like it-
 it certainly beats the cactus barcode design.


 I hope your nose is kind to you this week :)

Sharing here:
Craftionary


Tuesday, July 3, 2012

How to make a Robot Mask

How to Make a Robot Mask Tutorial

Art teachers are always being asked to just "whip up" something for someone.

It could be to screen print t-shirts for the cross country team,
make a gigantic fly for a sketch on assembly (true story)
or in this case 12 robot masks for a drama competition.

So even though it is school holidays,
this is what I've been up to.


Begin with a generic paper mask like this one.
They cost about $1 (or less) from art stores.


Grab a pencil and mark out your areas as below.


Get a kraft knife and cut out the eyes
(be careful, your goal is
 to retain your own eyesight and all of your fingers).


With silver acrylic paint,
brush on the eyes, center head and sides of the cheeks.


Mix silver and blue paint together to paint the other areas.


Use black paint and a smaller brush
 to define the feature areas.


Use a cotton bud to dot on 'rivits'


I used off-cut stickers from Reverse Garbage
to create the central detail on the forehead or you could paint something similar.


Too easy- look and it doesn't have to be perfect.


And you could add more, or less as you desire/require.


Metropolis x 12 and now...
to tackle the astronaut helmets.


Sharing this Elle and Lou Post at
Bloom designs
My Creative Space

Wednesday, May 16, 2012

La Dolce Vita is up-cycling

Now call it opportunistic BUT,
 when the kids are at school is my best chance to...


 ... go through their rooms and throw out crap
- they are such hoarders!

If you have a daughter,
chances are she went through PPP
 (plastic pony phase)

A word of encouragement:
thankfully there is light at the end of the tunnel.
I think my daughter has pretty much outgrown them.


Yesterday, I found this forgotten plastic pony carry case and couldn't help myself
-maybe I can be a hoarder too.

I soaked off the filly brand info and was left with a super  icky sticky but funky green briefcase.


"Movie Classics" has been featuring
 regularly in my up-cycling work lately.


A trim and a tweak,


 some glue and some sealer and...
La Dolce Vita!


Translated:
The Sweet Life or 
The Good Life


Ticket wallets fit perfectly- La Dolce Vita

Linking Elle and Lou here:
http://cheapcraftymama.com/pin-it-and-win-it-7/#comment-1199
http://www.releasemecreate.blogspot.com.au/
http://www.happygoluckyblog.com/
http://romantichome.blogspot.com.au/
http://chiconashoestringdecorating.blogspot.com.au/
http://www.craftionary.net/

Sunday, May 13, 2012

Art bangles: A class project for Primary Students

Now it may just be me..
but in my experience,
 the male gender aren't crash hot
 when it comes to buying presents for others.


This week I have been talking
 with quite a few mums
 about what goes on in their home for Mother's day.


Overwhelmingly, this is what happens:
It seems we mums buy our own presents,
subtly side passing them to our partners 
who in turn pass them on to the kids.

This has its benefits-we get what we want!
I know, because I'm getting a funky pair of knee high boots  (Oh! what a surprise!)

But really we mums have don't care about the present,
 it is the thought that counts.
 We are SO cliche sometimes!


Now I teach in a boys' college and I feel I am obliged to TRY and educate the young ones to think about others, especially their mums who do so much for them.

I admit,
 I also wanted to teach them about up-cycling,
artworks from a variety or historical and cultural contexts,
moulding materials and presentation.


So, we embarked on 62 bangles!
This how we did it...


  •   We began by soaking extra large paddle pop sticks in water for 24 hours.
  • Then carefully, we bent the pop sticks into a curve and put them in a small glass to dry for 24 hours. Some broke or splintered, but we had extras.


  • Next, the boys looked through old Art books and journals that were destined for the recycle bin. As they looked at the artworks spontaneous conversations, questions and analysis evolved. They chose an artwork that would become the feature of the gift tag and bangle.


  • A flat paddle pop stick was used as a template. Placing it onto the chosen artwork, they traced around the shape, cut out the art image and Mod Podged it onto the bangle. They sealed the outside of the bangle with Mod Podge also. 


  • To make the gift tag the boys used a circle punch to select a matching image. This was then glued on blue industrial offcuts. 
  • They punched white paper for the reverse side, glued it and wrote a sweet message for their mum.
  • Then the boys punched a small hole and inserted the string. 


  •  Finally the boys wrapped the bangle, inserting the information note below.


I know the boys' mothers will appreciate the care their sons have taken in creating this gift for them and the boys were very proud of what they achieved.

Incidentally, this activity also gave the boys practice with their fine motor skills such as cutting, tracing and accuracy. Never underestimate how many primary students struggle with these simple tasks!

Anyhoot- Happy Mothers Day!

Post Note: my children made me some gorgeous Mother's  Day cards, as did my wonderful husband AND my knee high boots are a perfect fit...who would have thunk it ;)


Also, the original pop bangle idea is not mine it came from the creative  Tara at Craft Affection.


Sharing this Elle and Lou post here:
http://www.kadie-sevenalive.blogspot.com.au/
http://www.iheartnaptime.net/
http://cheapcraftymama.com/pin-it-and-win-it-7/#comment-1199
http://www.releasemecreate.blogspot.com.au/
http://www.happygoluckyblog.com/
http://romantichome.blogspot.com.au/
http://chiconashoestringdecorating.blogspot.com.au/
http://www.craftionary.net/


Tuesday, February 28, 2012

Communication in the Office - a true gift

Work dynamics are interesting to watch.
This probably explains the reason why "The Office"
 has enjoyed so much success all over the world.

I am so incredibly lucky to work with the best people.
Our office is casual, and happy, 
a place where you can speak your mind without fear of offending others
 or stepping on toes.


We laugh constantly and
I must say if you have a thing for political correctness....
it is probably best that you are not a regular visitor.


Maybe it is because there are are only 5 of us.

Maybe it is because we support each other,
and come to work with a positive attitude and are prepared to laugh at ourselves.


 I guess to some degree we are like minded-we are all about visual art.


In any case, 
when we began the term, I decided chocolate was in order!

So, I found a 1970's book,
sprouting outdated ideas about what an office involved
and how we 'communicated'.

I mod-podged the images onto the canister of chocolate
and placed it on our staff- kitchen table.

Like a good family,
I think work mates can come together around food.

What does your work place look like?


Sharing this Elle and Lou post here:
http://www.myuncommonsliceofsuburbia.com/
http://debbie-debbiedoos.blogspot.com.au/

Tuesday, November 8, 2011

3d Sculpture for Children


Kids love to build. 
They are naturally drawn to sculptural activities and relish in the challenges they bring! 

How simple are these 3d wonders?
 All we used was some bags of plain paper balls from a craft supplier (polystyrene balls would probably work too), black textas, a hot glue gun, bendy wire and pliers. The stands were pieces of throw away industrial plastic from Reverse Garbage


These sculptures are a great way to teach and clarify some of the elements.
 Children  (and adults) are often confused by shape and form but its easy really....a circle is a shape, but a sphere is a form. These primary school sculptures were achieved through a focus on shapeline and form (some elements of art). The students 'drew' line work on the spheres and through the manipulation of the wire.

Obviously balance (a principle of art) was also a major consideration both visually and structurally. The little artists loved figuring out how far they could 'push' the design before it physically tipped - some great problem solving resulted.


I did this with Year 6 but I could easily take it into the secondary school classes.  
This was fun, fun, fun!